Detailed instructions for getting bootchart to profile the boot of your thin clients.
- Create a new, separate LTSP chroot for profiling thin clients
sudo ltsp-build-client --base /opt/ltsp-profiling
- Go into that chroot and install bootchart
sudo chroot /opt/ltsp-profiling/i386 apt-get install bootchart
a bunch of packages will be installed, including Cups and Java(!). Not to
worry, you created a new ltsp chroot environment for a reason.
- Using your favourite editor, open the file
/opt/ltsp-profiling/i386/etc/usr/share/initramfs-tools/scripts/nfs, go
to line 93 and add in a single line, init=/sbin/init so it looks like:
        # loop until nfsmount succeds
        init=/sbin/init
        while [ ${retry_nr} -lt ${delay} ] && [ ! -e ${rootmnt}${init} ]; do
If you're interested, this little hack avoids a problem booting where
/sbin/bootchartd is only available on the initramfs.
- Update your initrd image and sync to the tftp server so the thin client
gets the updated initrd.
sudo chroot /opt/ltsp-profiling/i386 update-initramfs -u -k all
sudo ltsp-update-kernels
- Add an extra line to /etc/exports on the server to allow your new
nfs root to be mounted by thin clients
/opt/ltsp-profiling *(ro,no_root_squash,async)
and then run this command to restart the nfs server
sudo /etc/init.d/nfs-kernel-server restart
- Set the root password on your thin client chroot with the command.
sudo chroot /opt/ltsp-profiling/i386 passwd
- Pick a thin client to profile and determine it's MAC address. Setup an
entry in /etc/ltsp/dhcpd.conf to point that client to your new chroot,
eg.
host tilly {
	hardware ethernet 00:B0:D0:05:FA:20;
	fixed-address tilly.homenet;
	option root-path "/opt/ltsp-profiling/i386";
}
remember to restart the DHCP server so this takes effect.
sudo /etc/init.d/dhcp3-server restart
- Create a custom pxelinux.cfg file to modify the booting details for this
mac address. Do this by copying the default, as follows:
cd /var/lib/tftpboot/ltsp/i386/pxelinux.cfg/
cp default 01-00-b0-d0-05-fa-20
where 00:B0:D0:05:FA:20 is the mac address of the computer to use it (NB the
01- at the start and the lower case letters throughout).
- Edit the pxelinux config you just created and change the DEFAULT
line to remove the silent and splash and add an
init, as follows:
DEFAULT vmlinuz ro initrd=initrd.img init=/sbin/bootchartd
- Boot your thin client. When you get to the ldm screen, press
<CTRL><ALT><F1> to get to a text screen and login
with username root and the password you set a moment ago.
- If you look in /var/log/bootchart/ you should see either a file
called bootchart.tgz (the temporary data file), or a png image. If the png
image is there, bootchart is finished. If you see the data file, the bootchart
image creator may still be running (try 'top' to see it) or may have died (some
lesser thin clients probably can't do the image creation). Use scp to transfer
the files back to the server.
scp -r /var/log/bootchart/ <username>@192.168.1.2:/tmp
- If you only have the data file at this point, you can install bootchart on
the server (or use the one in the chroot) to convert it by hand. You can get
instructions for the conversion by looking in
/etc/init.d/stop-bootchart
- To revert the thin client back to normal, just remove the DHCP entry and
the pxelinux.cfg file. To profile another client you need only repeat
steps 7 onwards. This should not affect any of your other working thin
clients.
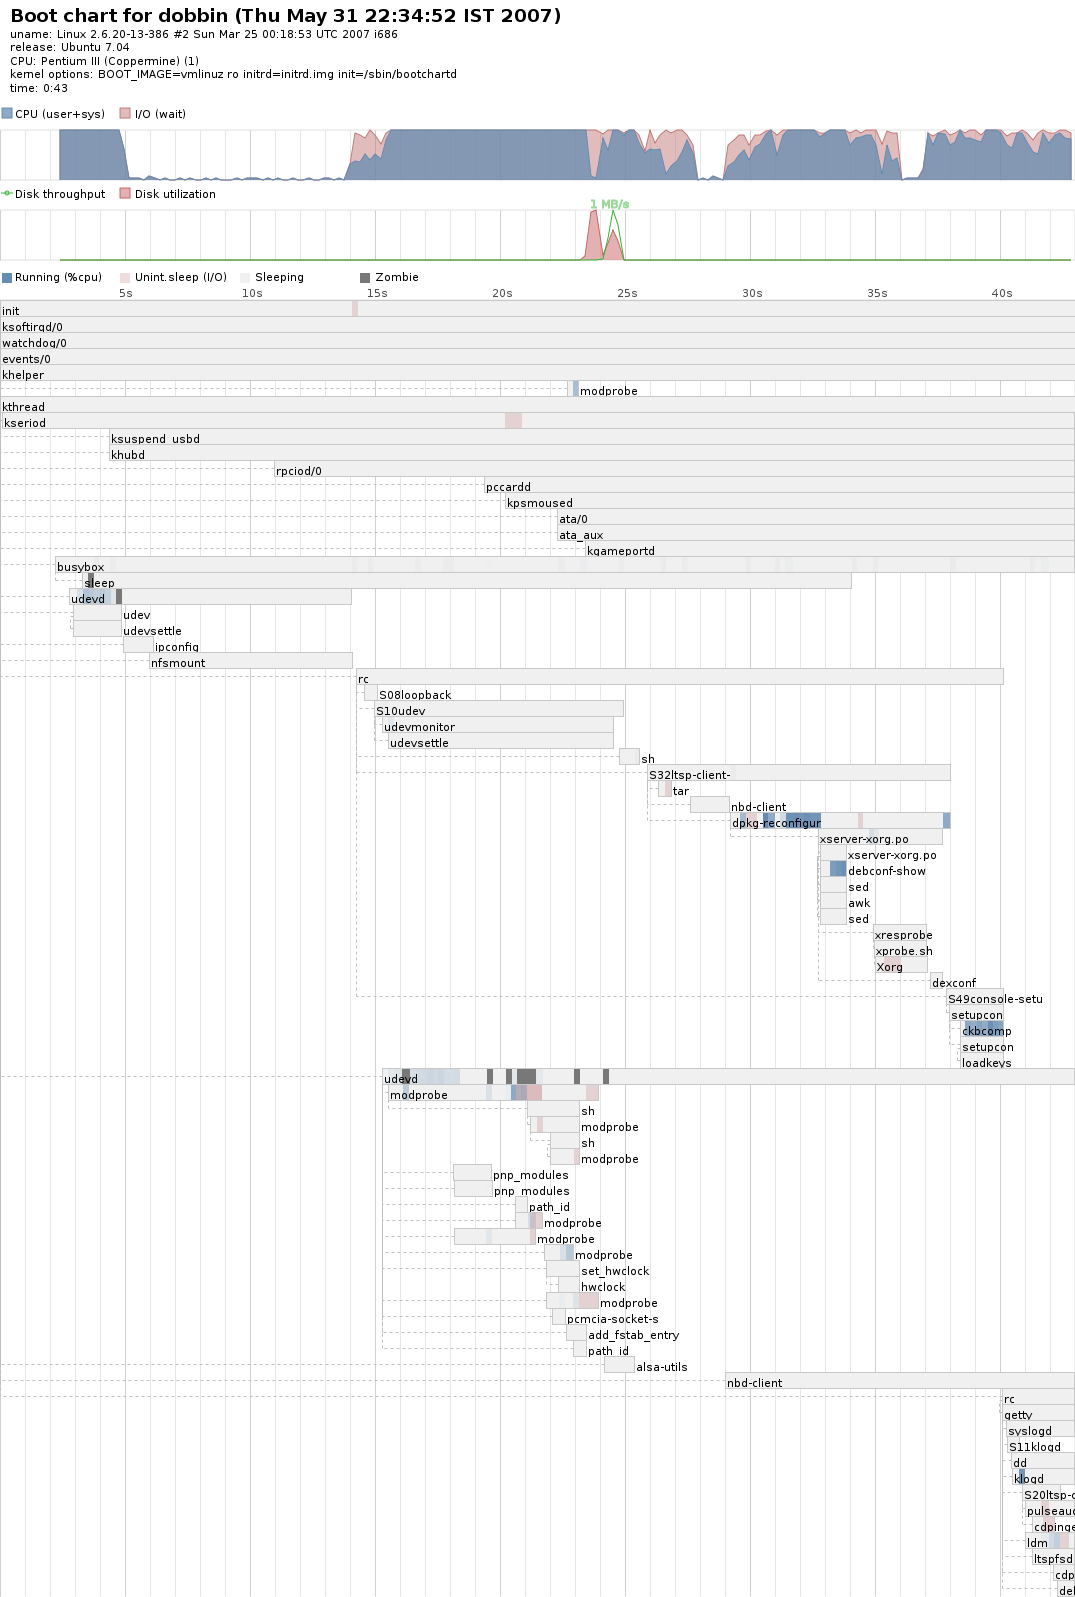
The final output should be a PNG image like the one below, generated from my
Dell Latitude L400 laptop.